Quick Start Guide – Time Machine AIX for WebSphere-ND
The following is a quick guide to evaluating Solution-Soft’s Time Machine with IBM’s WebSphere-ND (Network Deploy) SOA Application Server. The Network-Deploy version behaves a bit differently than stand-alone WebSphere application servers and thus requires a different approach when used with Time Machine; specifically the default is that all instances of applications servers run in the context of root. While this can be changed in the administration console to some extent, some environments prefer to keep the context in the default mode. This paper will show how simple it is to integrate Time Machine to perform date & time (temporal) testing with WebSphere-ND running as ‘root’.
NOTE: This paper is specific to Time Machine for use with IBM UNIX AIX. For those running WebSphere-ND on other platforms please refer to the Time Machine manual or contact Solution-Soft support atsupport@solution-soft.com
Time Machine for WebSphere is supported on Windows, AIX, HP-UX, Linux, and Solaris
System Configuration used in creating this paper:
OS: AIX 5.3 Power 6, 2 CPUs, 4096 MB ram.
Time Machine: Version 4.01 R48 for IBM AIX 5.3.0. Build Date: 10/27/10
IBM WebSphere: ND, 6.1.0.0 Build Number: b0837.02 Build Date: 9/15/08
1) Logon to WebSphere Solutions Console as the Administrator. In this case WebSphere-ND is running on
http://172.29.147.119:9062/ibm/console/login.do
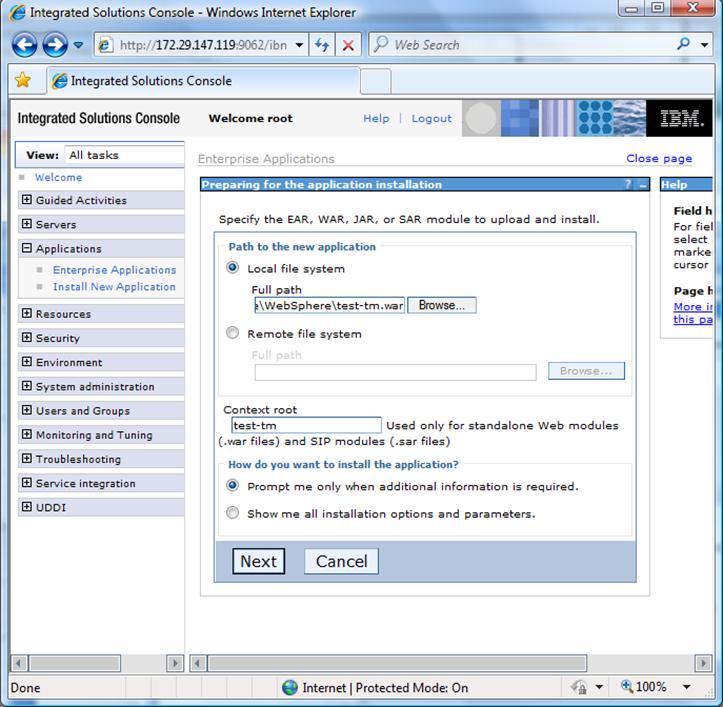
Expand “Application” Then click on Install “New Application”
In the center pane click on “Local file system” then browse to your test WAR file.
NOTE: Solution-Soft has a sample WAR file located here: ftp://ftp.solution-soft.com/pub/tm/aix/530/war/test.war.
The source code used in this example is also available at the end of this document
In Context-root enter a name for the application. We’ll use “test-tm”.
Click [next]
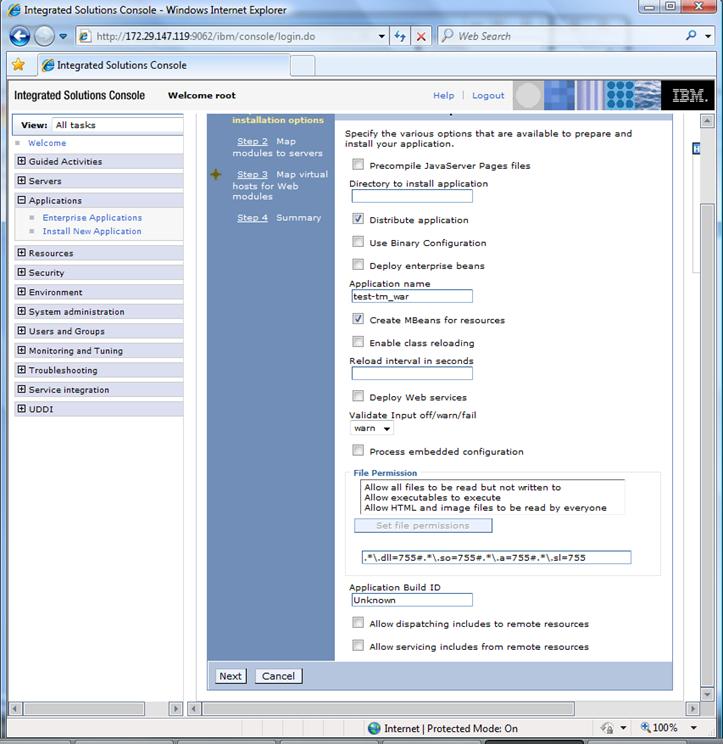
2) On the next page (see image below) leave all the default setting as-is and click [Next]
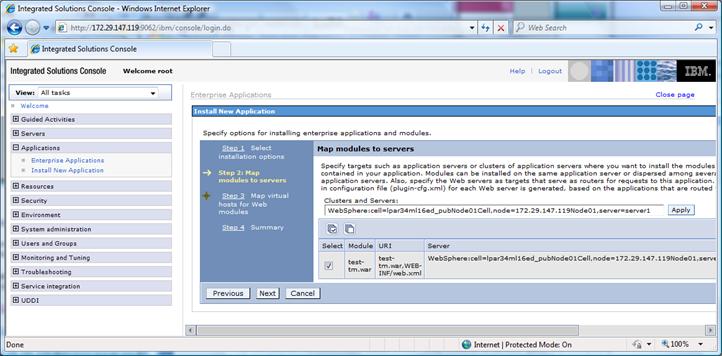
3) Now click on the select radio button in the “Map modules to servers” pane and click [Next]
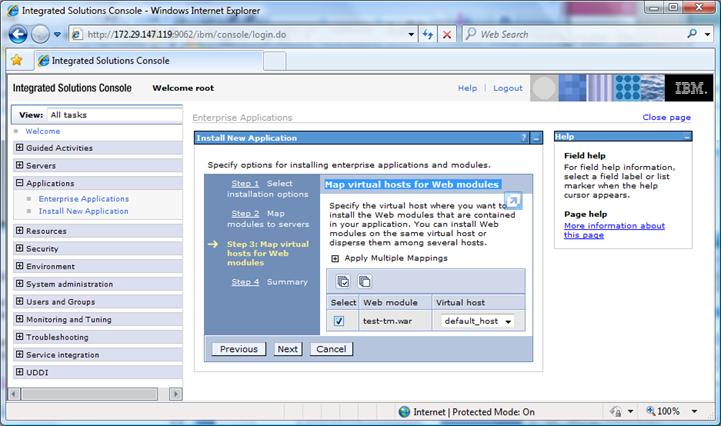
4) In the “Map virtual hosts for Web modules” select the radio button for the new Web Module and click [Next].
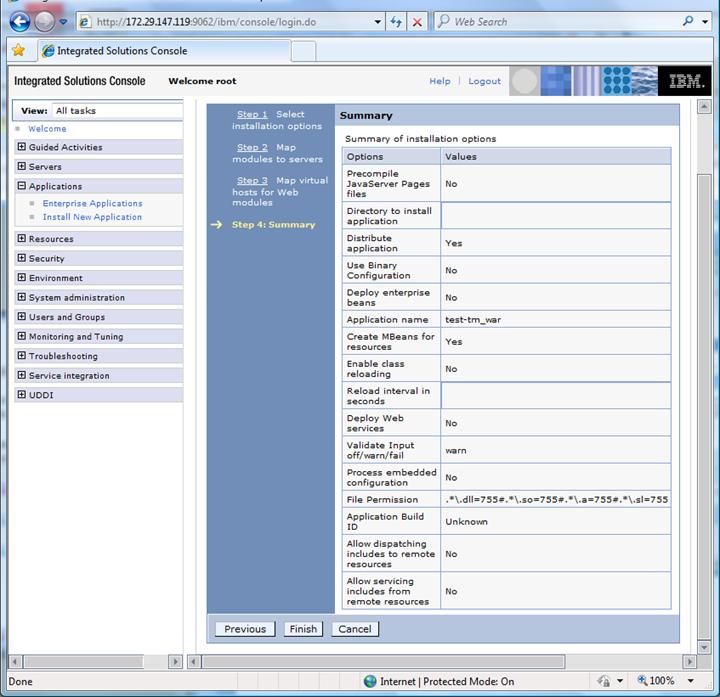
5) On the Summary page (step 4) keep all the defaults and click [Finish].
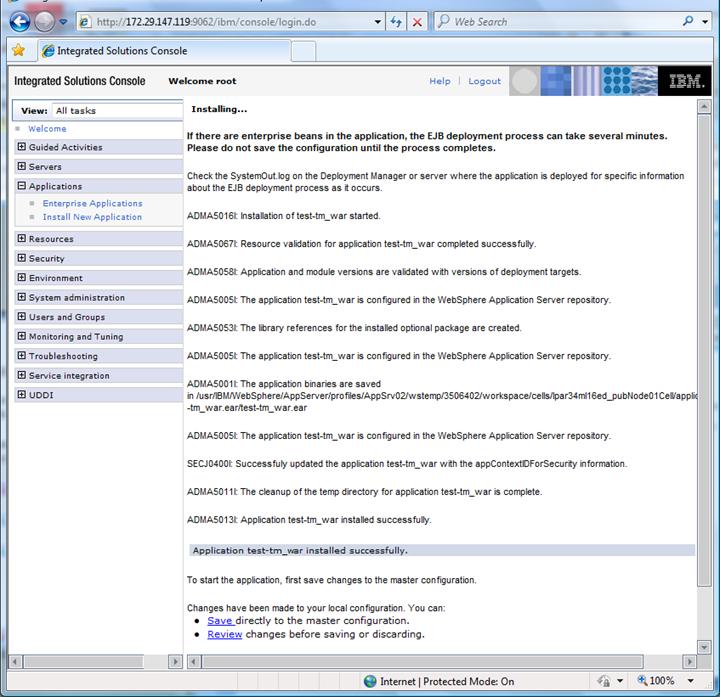
6) Now you should see an Installation Summary and Success message as seen below.
Click on link named “Save” to save changes to the master configuration.
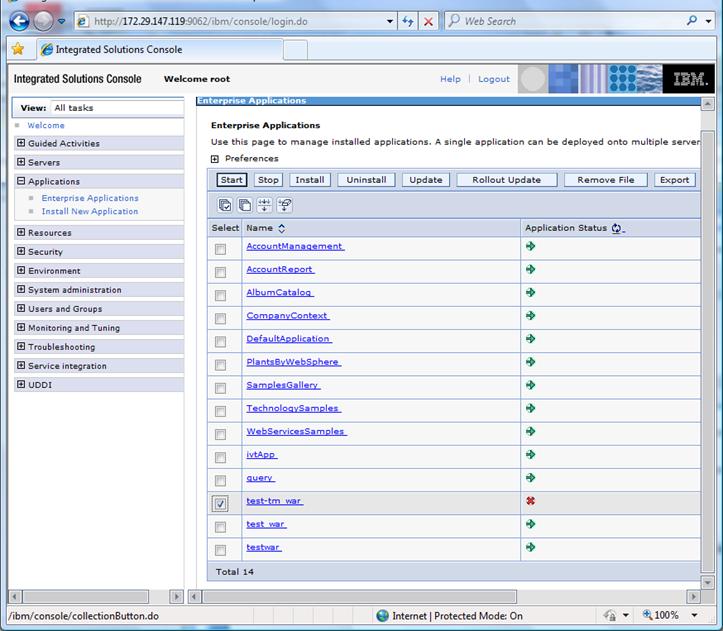
7) In the Management’s left console expand the “Applications” tab again and click on the “Enterprise Applications” link.
8) The center pane now becomes “Enterprise Applications”. Locate your new application and select the button to the left of its name and then click [Start]. The Application Status field’s Arrow Icon will change from red to green once it is started.
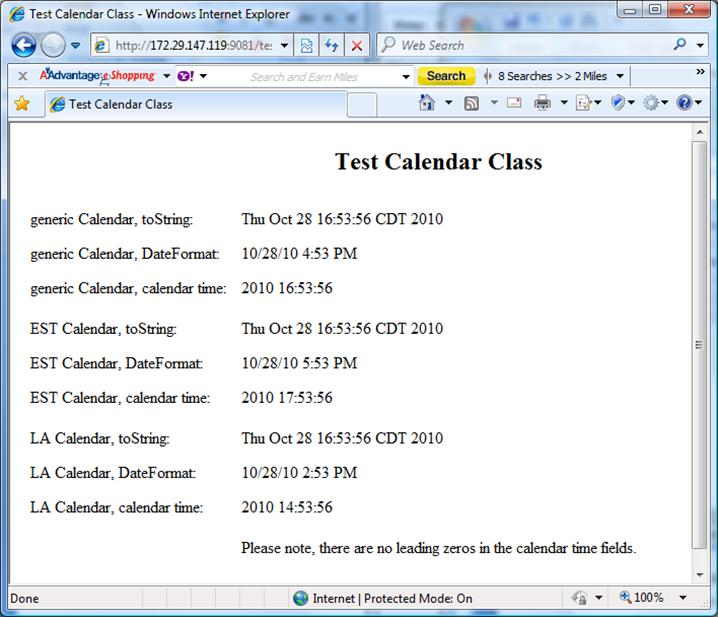
9) Now the new test application should be running on the machine in the default location.
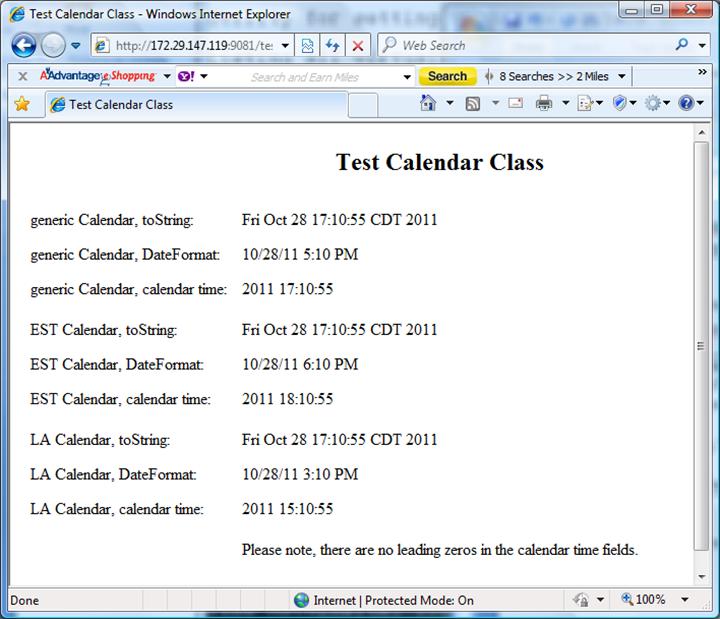
In the case of the machine used for this paper it is http://172.29.147.119:9081/test-tm/. Start another Web browser window and launch the application to verify it shows current system time & date correctly.
Now assign a Time Machine virtual date to the WebSphere server running this test application.
11) From the AIX command line enter the following “ps -ef | grep server1”. This will show the process ID of the WebSphere application server, assuming it is called “server1”. We will use the process ID in Time Machine to assign the virtual date. You will see a result much like the condensed view below:
12) From the command line set a virtual date exactly one year ahead of the system clock by entering “/etc/ssstm/tmproc -a -p 352500 -y 1”. Now reload the test application to see the date one year ahead.
Utility for setting TM kernel module configuration.
PID 352500 has been added with a running virtual clock [speed = 1]: Fri Oct 28 17:09:36 2011
13) Go back to your browser window for the new test application and hit the refresh button.
The date will now show one year in the future!
14) Now let’s try something really complex. Assign the WebSphere server a Time Machine virtual date of February 28th, 2021 at 3:15 am and to top that off we will also give the application an accelerated clock so that the clock speed is 100 times faster than real time.
Enter “etc/ssstm/tmproc -a -p 352500 –x 022803152021 –s 100”
15) Go back to the Application view in your browser and repeatedly hit your refresh button. You will see the clock moving forward, starting from the year 2021, but at a very fast rate.

16) To set the WebSphere server back to real time enter “/etc/ssstm/tmproc -d -p 352500” to delete the virtual date assigned to this process. If you are running a number of instances of application servers and they all have virtual clocks assigned to them you can reset them all back to the system time by running “/etc/ssstm/tmproc reset”.
_______________________________________________________________________________________________________________________________________________________________
The following is the source code for the test application, JavaServerPage-testTime1.jsp.
<%@ page import="java.io.*" %>
<%@ page import="java.util.*" %>
<%@ page import="java.text.DateFormat" %>
<HTML>
<HEAD><TITLE> Test Calendar Class </TITLE></HEAD> <BODY>
<% Calendar cal = Calendar.getInstance();
Calendar cal2 = Calendar.getInstance(TimeZone.getTimeZone("America/New_York"), Locale.US);
Calendar cal3 = Calendar.getInstance(TimeZone.getTimeZone("America/Los_Angeles"), Locale.US);
Date dt = new Date(); %>
<table cellpadding=5 cellspacing=5>
<tr>
<td valign><h2> <center> Test Calendar Class </center></h2> </td> </tr>
<tr>
<td>generic Calendar, toString: </td>
<td> <% out.print(cal.getTime().toString()); %></td> </tr>
<tr>
<td> generic Calendar, DateFormat: </td>
<td> <% DateFormat df = DateFormat.getInstance();
df.setCalendar(cal);
out.print(df.format(cal.getTime())); %> </td> </tr>
<tr>
<td>generic Calendar, calendar time: </td>
<td> <% out.print(cal.get(Calendar.YEAR) +" "+ cal.get(Calendar.HOUR_OF_DAY) +":"+
cal.get(Calendar.MINUTE) +":"+ cal.get(Calendar.SECOND)); %> </td>
</tr>
<tr>
<td> EST Calendar, toString:</td>
<td> <% out.print(cal2.getTime().toString()); %> </td> </tr>
<tr>
<td> EST Calendar, DateFormat: </td>
<td> <% DateFormat df2 = DateFormat.getInstance();
df2.setCalendar(cal2);
out.print(df2.format(cal2.getTime())); %> </td> </tr>
<tr>
<td> EST Calendar, calendar time: </td>
<td> <% out.print(cal2.get(Calendar.YEAR) +" "+ cal2.get(Calendar.HOUR_OF_DAY) +":"+ cal2.get(Calendar.MINUTE) +":"+ cal2.get(Calendar.SECOND)); %></td>
</tr>
<tr>
<tr>
<td>LA Calendar, toString: </td>
<td> <% out.print(cal3.getTime().toString()); %></td> </tr>
<tr>
<td> LA Calendar, DateFormat:</td>
<td> <% DateFormat df3 = DateFormat.getInstance();
df3.setCalendar(cal3);
out.print(df3.format(cal3.getTime())); %></td> </tr>
<tr>
<td> LA Calendar, calendar time: </td>
<td> <% out.print(cal3.get(Calendar.YEAR) +" "+ cal3.get(Calendar.HOUR_OF_DAY) +":"+ cal3.get(Calendar.MINUTE) +":"+ cal3.get(Calendar.SECOND)); %></td>
</tr>
<tr>
<td> Please note, there are no leading zeros in the calendar time fields. </td>
</tr>
</table>
<br>
</body>
</html>